This article is an update of a previous post explaining how to setup a second cluster on a second data center to be used as disaster recovery (or to run some off site queries, like long reports, etc..).
This new article covers also the CLONE plugin. Before you ask, CLONE plugin and Replication Channel Based Filters are only available in MySQL 8.0 ! It’s time to upgrade, MySQL 8 is Great !
Also, for DR only, a single MySQL instance acting as asynchronous replica is enough. But if for any reason you want to also have a HA cluster in the second data center, not using replication channel based filers is not the recommended solution and requires to hack with multiple MySQL Shell versions. You should forget about it.
So, if you plan to have 2 clusters, the best option is to setup the asynchronous link between the two clusters and use replication channel based filters. Please be warned that there is NO conflict detection between the two clusters and if you write on both conflicting data at the same time, you are looking for troubles !

So we have in DC1 the following cluster:
MySQL  mysql-dc1-1:33060+ ssl  JS > cluster.status()
 {
     "clusterName": "clusterDC1",
     "defaultReplicaSet": {
         "name": "default",
         "primary": "mysql-dc1-1:3306",
         "ssl": "REQUIRED",
         "status": "OK",
         "statusText": "Cluster is ONLINE and can tolerate up to ONE failure.",
         "topology": {
             "mysql-dc1-1:3306": {
                 "address": "mysql-dc1-1:3306",
                 "mode": "R/W",
                 "readReplicas": {},
                 "replicationLag": null,
                 "role": "HA",
                 "status": "ONLINE",
                 "version": "8.0.18"
             },
             "mysql-dc1-2:3306": {
                 "address": "mysql-dc1-2:3306",
                 "mode": "R/O",
                 "readReplicas": {},
                 "replicationLag": null,
                 "role": "HA",
                 "status": "ONLINE",
                 "version": "8.0.18"
             },
             "mysql-dc1-3:3306": {
                 "address": "mysql-dc1-3:3306",
                 "mode": "R/O",
                 "readReplicas": {},
                 "replicationLag": null,
                 "role": "HA",
                 "status": "ONLINE",
                 "version": "8.0.18"
             }
         },
         "topologyMode": "Single-Primary"
     },
     "groupInformationSourceMember": "mysql-dc1-1:3306"
And we would like to have similar cluster on the second DC:
- clusterDC2
- mysql-dc2-1
- mysql-dc2-2
- mysql-dc2-3
The first thing we will do is to CLONE the dataset from clusterDC1 to mysql-dc2-1. To do so, we will create an user with the required
privileges on the Primary-Master in DC1 :
SQL > CREATE USER 'repl'@'%' IDENTIFIED BY 'password' REQUIRE SSL;
SQL > GRANT REPLICATION SLAVE, BACKUP_ADMIN, CLONE_ADMIN
      ON . TO 'repl'@'%';
I explained this process in this post.
Now in mysql-dc2-1 we will create a cluster after having done dba.configureInstance(…) (I usualy create a dedicated user to manage the cluster):
MySQL mysql-dc2-1:33060+ ssl JS > cluster2=dba.createCluster('clusterDC2')
From the user we created, we need to add the required privilege for CLONE:
SQL > GRANT CLONE_ADMIN ON *.*  TO clusteradmin;
SQL > SET GLOBAL clone_valid_donor_list='192.168.222.3:3306';
We can now stop Group Replication and start the CLONE process:
MySQL  mysql-dc2-1:33060+ ssl  SQL > stop group_replication;
MySQL  mysql-dc2-1:33060+ ssl  SQL > set global super_read_only=0;

MySQL  127.0.0.1:3306 ssl  SQL > CLONE INSTANCE FROM
                   repl@192.168.222.3:3306 IDENTIFIED BY 'password';
Now we have the same data on mysql-dc2-1 and we can recreate the cluster as it has been overrided by the CLONE process. After that, we will be able to join the other two servers of DC2:
MySQL mysql-dc2-1:33060+ ssl JS > cluster=dba.createCluster(‘clusterDC2’)
MySQL  mysql-dc2-1:33060+ ssl  JS > cluster=dba.createCluster('clusterDC2')
MySQL  mysql-dc2-1:33060+ ssl  JS > cluster.addInstance('clusteradmin@mysql-dc2-2')
MySQL  mysql-dc2-1:33060+ ssl  JS > cluster.addInstance('clusteradmin@mysql-dc2-3')
We finally have our second cluster in our Disaster Recover Data Center:
MySQL  mysql-dc2-1:33060+ ssl  JS > cluster.status()
 {
     "clusterName": "clusterDC2",
     "defaultReplicaSet": {
         "name": "default",
         "primary": "mysql-dc2-1:3306",
         "ssl": "REQUIRED",
         "status": "OK",
         "statusText": "Cluster is ONLINE and can tolerate up to ONE failure.",
         "topology": {
             "mysql-dc2-1:3306": {
                 "address": "mysql-dc2-1:3306",
                 "mode": "R/W",
                 "readReplicas": {},
                 "replicationLag": null,
                 "role": "HA",
                 "status": "ONLINE",
                 "version": "8.0.18"
             },
             "mysql-dc2-2:3306": {
                 "address": "mysql-dc2-2:3306",
                 "mode": "R/O",
                 "readReplicas": {},
                 "replicationLag": null,
                 "role": "HA",
                 "status": "ONLINE",
                 "version": "8.0.18"
             },
             "mysql-dc2-3:3306": {
                 "address": "mysql-dc2-3:3306",
                 "mode": "R/O",
                 "readReplicas": {},
                 "replicationLag": null,
                 "role": "HA",
                 "status": "ONLINE",
                 "version": "8.0.18"
             }
         },
         "topologyMode": "Single-Primary"
     },
     "groupInformationSourceMember": "mysql-dc2-1:3306"
 }
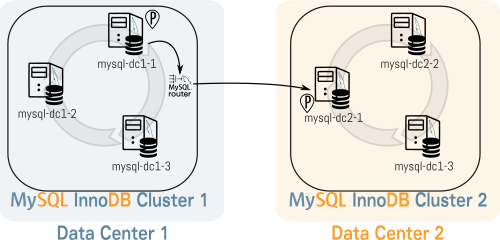
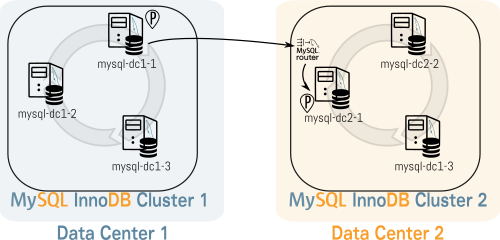
Now, before creating the asynchronous link, we have to bootstrap the MySQL Router.
We have two options, we can setup the router that connect on DC1 in DC2 or let it in DC1. This is an illustration
of both options:


I have chosen option 2. On mysql-dc2-1, the Primary-Master of DC2, I bootstrap the router that connects on DC1:
[root@mysql-dc2-1 ~]# mysqlrouter --bootstrap clusteradmin@mysql-dc1-1 \
                      --user=mysqlrouter --conf-use-gr-notifications
 Please enter MySQL password for clusteradmin:
 Bootstrapping system MySQL Router instance…
 Checking for old Router accounts
 No prior Router accounts found
 Creating mysql account 'mysql_router1_abv0q7dfatf6'@'%' for cluster management
 Storing account in keyring
 Adjusting permissions of generated files
 Creating configuration /etc/mysqlrouter/mysqlrouter.conf
 MySQL Router configured for the InnoDB cluster 'clusterDC1'
 After this MySQL Router has been started with the generated configuration
 $ /etc/init.d/mysqlrouter restart
 or
     $ systemctl start mysqlrouter
 or
     $ mysqlrouter -c /etc/mysqlrouter/mysqlrouter.conf
 the cluster 'clusterDC1' can be reached by connecting to:
 MySQL Classic protocol
 Read/Write Connections: localhost:6446
 Read/Only Connections:  localhost:6447
 MySQL X protocol
 Read/Write Connections: localhost:64460
 Read/Only Connections:  localhost:64470
And we start MySQL Router:
[root@mysql-dc2-1 ~]# systemctl start mysqlrouter
Now we can setup the asynchronous link between DC1 and DC2 where DC2 is the replica of DC1.
This asynchronous replication link will use a dedicated channel and filter out the metadata of the cluster:
SQL> CHANGE MASTER TO MASTER_HOST='localhost', MASTER_PORT=6446,
     MASTER_USER='repl', MASTER_PASSWORD='password',
     MASTER_AUTO_POSITION=1, MASTER_SSL=1, GET_MASTER_PUBLIC_KEY=1
     FOR CHANNEL 'repl_from_dc1';

SQL> CHANGE REPLICATION FILTER REPLICATE_IGNORE_DB=(mysql_innodb_cluster_metadata)
     FOR CHANNEL 'repl_from_dc1';

SQL> START SLAVE FOR CHANNEL 'repl_from_dc1';
And we can verify it:
MySQL  mysql-dc2-1:33060+ ssl  SQL > show slave status for channel 'repl_from_dc1'\G
 * 1. row *
                Slave_IO_State: Waiting for master to send event
                   Master_Host: localhost
                   Master_User: repl
                   Master_Port: 6446
                 Connect_Retry: 60
               Master_Log_File: binlog.000003
           Read_Master_Log_Pos: 26261
                Relay_Log_File: mysql-dc2-1-relay-bin-repl_from_dc1.000002
                 Relay_Log_Pos: 2107
         Relay_Master_Log_File: binlog.000003
              Slave_IO_Running: Yes
             Slave_SQL_Running: Yes
               Replicate_Do_DB:
           Replicate_Ignore_DB: mysql_innodb_cluster_metadata
            Replicate_Do_Table:
        Replicate_Ignore_Table:
       Replicate_Wild_Do_Table:
   Replicate_Wild_Ignore_Table:
                    Last_Errno: 0
                    Last_Error:
                  Skip_Counter: 0
           Exec_Master_Log_Pos: 26261
               Relay_Log_Space: 2327
               Until_Condition: None
                Until_Log_File:
                 Until_Log_Pos: 0
            Master_SSL_Allowed: Yes
            Master_SSL_CA_File:
            Master_SSL_CA_Path:
               Master_SSL_Cert:
             Master_SSL_Cipher:
                Master_SSL_Key:
         Seconds_Behind_Master: 0
 Master_SSL_Verify_Server_Cert: No
                 Last_IO_Errno: 0
                 Last_IO_Error:
                Last_SQL_Errno: 0
                Last_SQL_Error:
   Replicate_Ignore_Server_Ids:
              Master_Server_Id: 3939750055
                   Master_UUID: b06dff8e-f9b1-11e9-8c43-080027b4d0f3
              Master_Info_File: mysql.slave_master_info
                     SQL_Delay: 0
           SQL_Remaining_Delay: NULL
       Slave_SQL_Running_State: Slave has read all relay log; waiting for more updates
            Master_Retry_Count: 86400
                   Master_Bind:
       Last_IO_Error_Timestamp:
      Last_SQL_Error_Timestamp:
                Master_SSL_Crl:
            Master_SSL_Crlpath:
            Retrieved_Gtid_Set: 5765e9ea-f9b4-11e9-9f0e-080027b4d0f3:39-43
             Executed_Gtid_Set: 5765e9ea-f9b4-11e9-9f0e-080027b4d0f3:1-43,
 ae94a19d-f9b8-11e9-aaf5-080027b4d0f3:1-36
                 Auto_Position: 1
          Replicate_Rewrite_DB:
                  Channel_Name: repl_from_dc1
            Master_TLS_Version:
        Master_public_key_path:
         Get_master_public_key: 1
             Network_Namespace:
Now if the Primary-Master in DC1 changes, the asynchronous replication link will still work and DC2 as it uses the MySQL Router to point the the new Primary-Master. However is the Primary Master on DC2 dies, you will have to manually configure and start asynchronous replication on the new Master. Such operation can be performed automatically but you need to use an external tool as explained in this post.
You can already bootstrap and start MySQL Router on DC1 and setup asynchronous replication but I would recommend to not start it and use it only if DC2 gets the writes in case of disaster.