MySQL InnoDB Cluster is the most easy and integrated High Availability solution for MySQL.
The solution is composed of:
- MySQL Server
- MySQL Group Replication Plugin
- MySQL Clone Plugin
- MySQL Router
- MySQL Shell
All those components are developed and tested together to provide the easiest and best experience to the MySQL users.
As the MySQL Router is a TCP Level 4 router (like HA Proxy), some users requiring a more “intelligent” proxy having other extra features like caching, read/write splitting in relation with the user or SQL, firewall, … may be interested in using ProxySQL… and this is a good choice !
Clik here to view.

However, even is ProxySQL supports MysQL Group Replication, for users coming from the easy experience when using MySQL InnoDB Cluster, the configuration might be a little confusing.
This is why I’ve created a plugin for the MySQL Shell to configure and use ProxySQL with MySQL InnoDB Cluster.
The plugin creates the hostgroups, the monitor user. It also allows you to import users from your cluster to ProxySQL without having to know any user password and leaved them hashed.
If the SYS Schema view used to monitor the cluster is missing, the plugin will also add it.
Let’s have a look on how to use it.
Installing the plugin
To install the plugin, the easiest way it to clone my github repository as ~/.mysqlsh/plugins/ext.
Then when you start MySQL Shell, you should have to possibility to see some objects in the ext global object:
Clik here to view.

Preparing ProxySQL
On ProxySQL, you need to create an admin user that can connect remotely (from where you orchestrate your environment using the MySQL Shell). ProxySQL allows only adminto connect from localhost.
In /etc/proxysql.cnf, you modify the admin_variable like this:
admin_credentials="admin:admin;radmin:fred"
If you do so, you need to stop ProxySQL, remove the proxysql.db (usually in /var/lib/proxysql) and restart ProxySQL.
Now you are able to connect to ProxySQL’s SQL admin interface:
[root@mysql1 proxysql]# mysql -h 192.168.91.2 -P 6032 -u radmin -pfred
 mysql: [Warning] Using a password on the command line interface can be insecure.
 Welcome to the MySQL monitor.  Commands end with ; or \g.
 Your MySQL connection id is 5
 Server version: 5.5.30 (ProxySQL Admin Module)
 Copyright (c) 2000, 2019, Oracle and/or its affiliates. All rights reserved.
 Oracle is a registered trademark of Oracle Corporation and/or its
 affiliates. Other names may be trademarks of their respective
 owners.
 Type 'help;' or '\h' for help. Type '\c' to clear the current input statement.
Using the MySQL Shell
Let’s consider that we have a MySQL InnoDB Cluster like this:
{
     "clusterName": "myCluster",
     "defaultReplicaSet": {
         "name": "default",
         "primary": "mysql1:3306",
         "ssl": "REQUIRED",
         "status": "OK",
         "statusText": "Cluster is ONLINE and can tolerate up to ONE failure.",
         "topology": {
             "mysql1:3306": {
                 "address": "mysql1:3306",
                 "mode": "R/W",
                 "readReplicas": {},
                 "replicationLag": null,
                 "role": "HA",
                 "status": "ONLINE",
                 "version": "8.0.17"
             },
             "mysql2:3306": {
                 "address": "mysql2:3306",
                 "mode": "R/O",
                 "readReplicas": {},
                 "replicationLag": null,
                 "role": "HA",
                 "status": "ONLINE",
                 "version": "8.0.17"
             },
             "node3": {
                 "address": "mysql3:3306",
                 "mode": "R/O",
                 "readReplicas": {},
                 "replicationLag": null,
                 "role": "HA",
                 "status": "ONLINE",
                 "version": "8.0.17"
             }
         },
         "topologyMode": "Single-Primary"
     },
     "groupInformationSourceMember": "mysql1:3306"
 }
We need to connect to one of the node, but for the configuration (writing the SYS Schema view used by ProxySQL and the monitor user, it’s better to connect directly to the primary master, mysql1 in our example. Once connected, we can create a ext.proxysql object by connecting to ProxySQL:
Clik here to view.
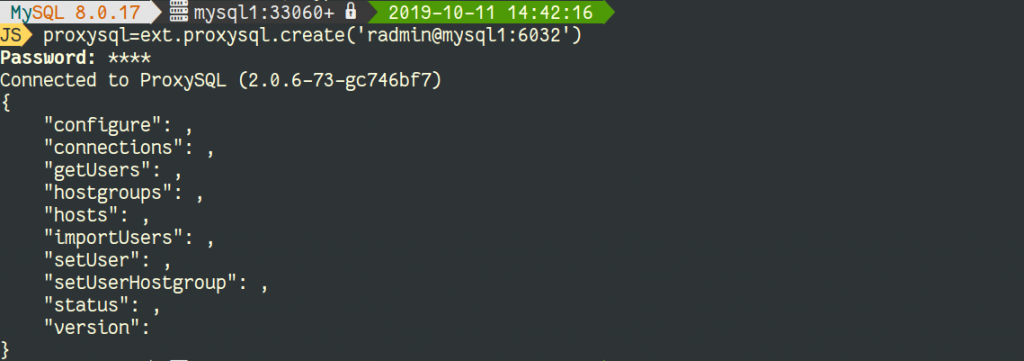
We can now use any method. But we also need to configure ProxySQL to use our MySQL InnoDB Cluster:
Clik here to view.

Great ! It’s possible now to see the hosts configured directly in ProxySQL and also the hostgroups that the plugin automatically created:
Clik here to view.

Now we can also import in ProxySQL the users that will connect to MySQL using the proxy. First let’s check the users created in MySQL:
Clik here to view.
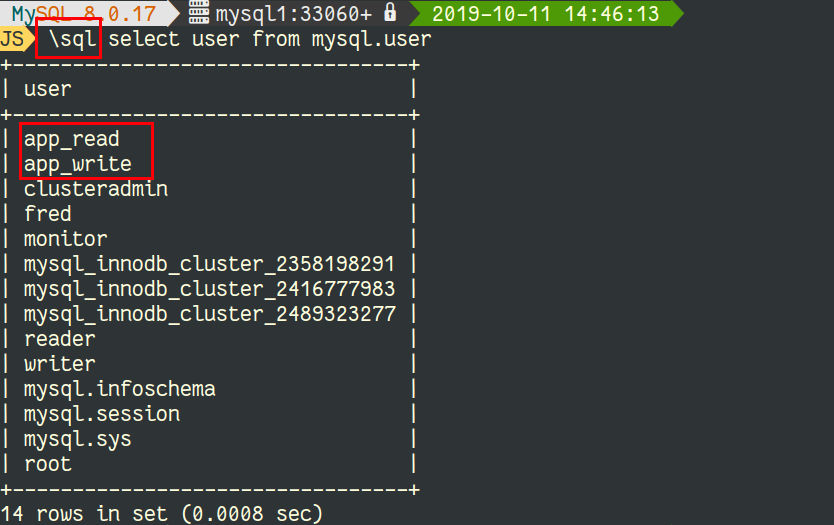
As we only want the app_% users to be imported in ProxySQL, we will use the importUsers() method, the first parameter is the hostgroup id:
Clik here to view.
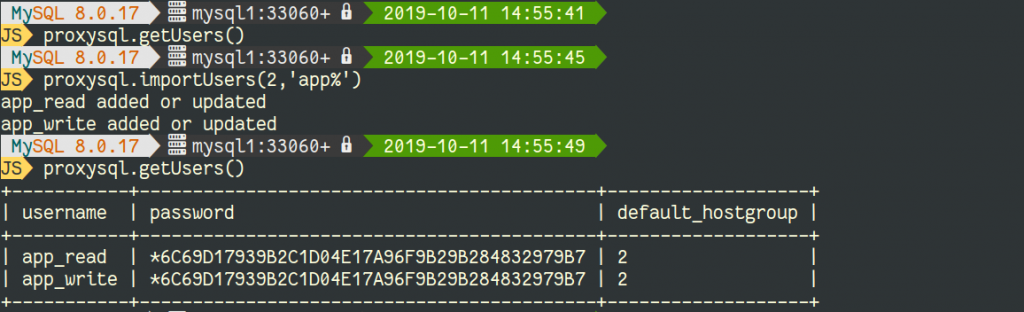
As you can see they are all imported in the hostgroup 2. We need to put our app_read user in hostgroup 3 (secondary / R/O) using setUserHostgroup() method:
Clik here to view.

As you can see, by default, the read/write split is done via the user. Of course you can still write your routing rules to the desired hostgroup.
And finally, we can see the usage and some statistics in the Shell using the status() method:
Clik here to view.
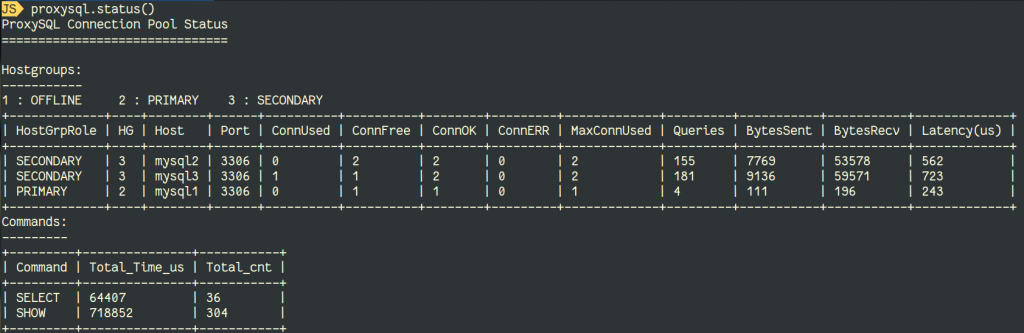
Conclusion
Thanks to the MySQL Shell’s plugin framework, it’s now possible to use ProxySQL with MySQL InnoDB Cluster with the same level of ease !
Don’t hesitate to test the plugin, improve it and submit pull requests Image may be NSFW.
Clik here to view.